

SNIPPETS
UK Geomagnetic Survey - Wookey
On-line data for magnetic disturbances
Electronics in Surveying: Abstracts - David Gibson
References to other relevant articles in print
Copyright in Cave Surveys - David Gibson
How copyright law affects cave surveyors
Garmin GPS45 review - Ian Harvey
A users view of this remarkable GPS unit
Surface Visualisation using Survex -Peter Eland (& Wookey)
Ways of importing surface topography data into the Survex Cave viewer for visualisation
You will notice that Compass Points has expanded to 16 pages with this issue. This is a sign that as it approaches its third birthday the Cave Surveying Group is continuing to grow and raise its profile sufficiently within the CREG for more people to notice what is going on and get involved.
If the success of the CREG field meets to date is any indication, then once we get a healthy contingent of surveyors at field meets, discussing problems & doing experiments, then there will be no stopping the flood of members, enthusiasm and articles. Details of the next meet are given below. I do hope to see some of you there.
One last thing. Over the last 11 issues there have only been about two paragraphs on actual surveying, as opposed the computers & survey instruments. I know for a fact there is a great deal of surveying and drawing going on in the UK at the moment (Draenen and Easegill spring to mind, as well as a number of smaller projects). I think we would all appreciate it if some of those involved could put pen to paper and describe what they are doing, how they are doing it, why they are doing it that way, and so on. This publication is your forum. Don't forget to use it...
17-19 May 1996 in the Peak District. More details in the Newssheet, or contact Mike Bedford. This is an excellent opportunity to come along and meet other cave surveyors, argue about techniques in the pub, get free surveying software, and do all those experiments you've always wanted to do, but could never find anyone interested to help.
There will be a discussion forum on possible improvements in LRUD data recording techniques, particularly with respect to getting more usefully complete surveys out of computers. Wookey is also keen to do some tests on variations in compass readings between users, and to accurately measure the magnetic effect of different lighting systems on Suuntos. There is also likely to be further work on radiolocation.
If any of these interest you, or you have your own experiments/software to do/demonstrate, then please come along.
I have been a busy Wook recently. Two weekends ago (10th Feb) I was at the NCA Expeditions Seminar, giving a talk on Expedition surveying . Then, as well as preparing this publication I have been working on a paper to be presented at the BCRA Science Symposium on 24th Feb. This will appear in a future issue of Compass Points and is entitled 'Cave Surveying Software - the current State of the Art'.
Over recent years there have been great strides in Surveying software as a) the problems of loop processing have been largely understood and programmed up, and b) sufficient processing power to do more advanced things becomes widely available. The paper looks at the above points and other issues that software authors must address (e.g. user interface, data input), then looks at facilities already available (in some software at least), such as versatile display features, extended elevation processing, LRUD processing, and blunder detection.
Then it moves on to look at what is currently being worked on; improved LRUD processing & recording, direct sketch importing and processing, more realistic cave rendering.
The final version of this is not yet in print, and if anyone knows of research and/or development going on in any of these (or other) advanced survey software features, I would be pleased to hear about them and mention them if appropriate.
Stuart France
I read the description of the 'high simplicity' arrangement in CP10 with both interest and dismay, having already tried some solutions of my own (see CP8) using fibre optic cable as a light conduit and, more recently, a surface-mount yellow LED (Farnell part 515-619) soldered to the end of an umbilical of thin twin copper flex and a battery at the rear of the helmet. Both these arrangements are non-magnetic and introduce no errors.
Unfortunately Daniel Gebauer's suggestion is not going to work. Notwithstanding that you can buy flat profile transparent LEDs (so there is no need to file down round ones), and that he relies on the internal battery resistance alone to limit the current to the LED, all types of conventional LEDs (the ones with legs) that I have examined are very magnetic indeed and can swing the compass reading by up to 40 degrees. As Daniel proposes that the LED leg is also the on/off switch: a magnetic object will move during the reading and so the error introduced will be dependent on the precise position of the leg relative to the compass body at any moment. I've also looked into lithium button cells. These are magnetic too, for example a Panasonic BR2325 positioned as shown in Daniel's diagram swings my compass by 15 degrees.
You may not think this matters if you calibrate your compass before using it to take account of these shifts. However I'm not convinced the error that is introduced is linear. Earlier problems I had with my spectacles demonstrate the problem: for example, they introduce a 0.5 degree error on a reading of 320 degrees, but an error of 1.5 degrees on a reading of 230 degrees (i.e. when at right angles to the former position). Honest!
I would suggest that it is not a smart idea to read your compass knowing that it is in an extraneous magnetic field. All efforts should be made to eliminate sources of error. This means using contact lenses not spectacles, checking your helmet for any magnetic effects and using non-magnetic compass lighting.
Ed: I agree with all of what Stuart has to say, and have also found that mounting a lithium cell as suggested will have significant magnetic effect. However I have found that it is possible to site a pair of silver oxide watch batteries on the end of the compass without significant magnetic effect (maybe 0.5-1 degree). I intend to test out this assertion at the next field meet, and invite anyone else working in the area of compass illumination to bring along their efforts, ideas & opinions (although it is probably rather a long way for Daniel G to come!)
Stuart France
Readers may be interested to know of an ultra-bright yellow LED (RS part number 178-1299 £1.17) which makes an excellent object to sight on. This is the brightest I've seen at a sensible price. It can be twiddled round on its station to point in the opposite direction for the next leg when leap-frogging. You can run it for about 100 hours from 2 x AA cells with a small series resistor (say 47 ohm) to limit the current.
As a bonus, at 6500mcd one of these LEDs is sufficiently bright to get you out of a cave if all your other lights have failed. I would expect, but I have not tested the idea, that linking up three of these LEDs would make a reasonable emergency light, comparable to a Petzl micro but giving 30 or so hours of light.
Wookey
Cave surveyors are being offered a very handy free service via the Internet. You can now get accurate (to the nearest hour) magnetic data for pretty well anywhere in the world. For most UK surveyors the three UK observatories will provide the info they need. The magnetic data provided is obviously very useful for identifying any anomalous magnetic activity that may have occurred last time you were down a hole in the ground, surveying.
The service can be accessed most easily via the World Wide Web, but also has an Email interface for those that don't have Web access. They do offer a postal service but you normally have to pay for it. I wrote to them a couple of years ago and was assured that we (The BCRA CSG) could use the service for free as an academic organisation, so long as not too many requests were made. It is probably best to get me or someone else you know with net access to get the data first, and if it is not available there to write direct as the CSG.
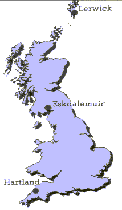
Have connected to their site you are presented with a form. You fill in who you are, which observatory you want data from (there are three covering the UK Lerwick, EaskdaleMuir, & Hartland), the start date, the period, and whether you want a text file of raw data, or a Postscript or GIF plot of the data. Both 3 and 4 axis plots are available. The four axes measured vary with the site (due to the instrument type used), although all the UK ones produce XYZ & F.
Once you have asked for your data it goes away and thinks about it for a couple of minutes before coming back with the answers. In my experience only the data for the last few weeks is kept so if you want to check up on the magnetic field for a survey, don't wait too long.
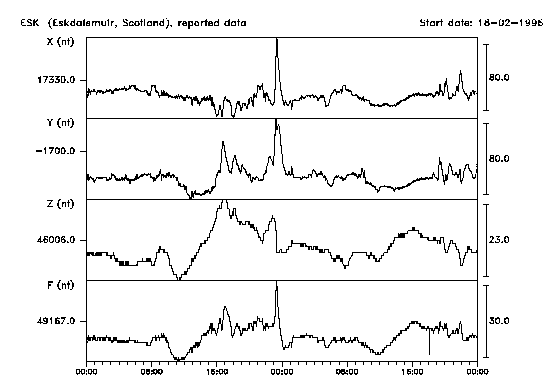
Here is a plot for two days starting on the 18th Feb 1996. The most obvious feature is the quite large peak just before midnight on the 18th.
Now we are only interested in the direction of the field in the horizontal plane, not its strength, as this is what a compass measures. Thus the F (overall field strength) & Z (vertical component) values are irrelevant, and we only need to look at the X & Y (horizontal components) values. To get the actual declination () from the X & Y values is very straightforward. From the equations relating angles and sides of right-angled triangles we have
Tan = Y/X = Tan -1 Y/X
So the typical value (e.g. at about 10am on the 18th) X=17310, Y=-1730, so = -5.71 which is about right. And at about 1pm where the Y value has dropped but the X remains normal, X=17290, Y=-1690, and = 5.58. Finally at the peak before midnight, X=17375, Y=-1670, and = 5.49. Thus you can see that a typical day's variation of 80 nanoTesla only produces about 0.13 variation, which means that a cave survey done on this day would not be detectably affected.
The entry point for the site is http://www.nmh.ac.uk/ and there is plenty of background on the sites, instrumentation and the organisation. If you want to go straight to the form it is here: http://ub.nmh.ac.uk/htbin/form
To find out about the Email access system, you need to mailto:e_gin@ub.nmh.ac.uk and send a message containing the text 'SEND INFORMATION'
by David Gibson
This article gives the abstracts of three articles on electronics and cave surveying which I have written recently.
Two of these articles appear in the Cave Radio Group's journal. The third was presented at the BCRA Science Symposium in February. It will, presumably, get published somewhere-or-other later on, though you can contact me for a draft copy if you are desperately keen.
Why haven't the articles appeared in Compass Points? The reason for this is that they are primarily articles on electronics. Compass Points has tended to concentrate on computing and techniques, but there is clearly some common ground which could be covered in either publication.
Methods of cave surveying are reviewed, including 'global positioning', and inertial navigation, as well as point-to-point methods. The use of electronic instrumentation for surveying, navigation and data-logging is discussed, with the intention of providing a background for electronic engineers wishing to embark on a cave-survey tool design project.
A range of components and modules useful for the design of electronic compass and navigation equipment are listed.
The article reviews some of the components which are currently available for compass/clinometer-type measurements. Essentially these are tilt sensors and magnetometers. One of the difficulties in using magnetometers is that if the compass is not double-gimballed then algorithms must be implemented to take into account the 'roll' and 'yaw' of the instrument. This is covered in the third article, below.
One way or another, you have to pay for the equipment you use. The sensors described in this article are fairly cheap (under £20) but the time and effort involved in designing an accurate instrument is enormous, especially if it is done in one's spare time. The alternative is to buy a finished product. There are several 'OEM' compass/clinometers on the market for prices as low as "several hundred" pounds. Some of these are listed in the article.
Cave surveying currently relies on visually reading a compass and clinometer. The price of magnetometers and solid-state inclinometers is falling rapidly. An electronic compass/clino with automatic data-logging is now feasible at an affordable price. However, the interpretation of the readings needs to be done with care. If the instruments are not gimballed then small errors in "pitch" and "roll" can have noticeable affects on the accuracy. Surprisingly, perhaps, more than three axes of measurement are required to compensate for this, and other sources of error. Four axes are essential, and five or six are an advantage. The 3-D processing of this information is straight-forward to implement, but difficult to derive. This paper gives formulae for the processing of multi-axis information, and explains the derivation using 3x3 rotation matrices.
by David Gibson
A couple of queries found their way to me recently. One was asking whether cave surveys were copyright since they were not "written works". Another asked whether the copyright to a survey which was made using a computer package was owned by the author of the package. Apparently the copyright statement for SURVEX, which appears on printouts, (and is a statement of copyright in the software), was mistaken for a claim on the copyright to the actual drawing!
Clearly there are "common-sense" answers
to the above questions. These also happen to be the legal position,
which
is that the copyright in cave surveys is owned by the author(s) of that survey, just as it is for any artistic work. Copyright in the original survey data is owned by the author(s) of that data, just as it is in any literary work.
Copyright in the UK is set out in the Copyright, Designs and Patents Act, 1988. You can buy a copy of this in HMSO book shops and it does, actually, make quite interesting reading (though you may think that makes me quite a sad person!). In the notes which follow, numbers in square brackets refer to clauses in the Act. Needless to say, I am not legally qualified to give copyright advice - this is my interpretation of what I have read.
Copyright to the original survey data resides with the author(s) of that data, and not to any caving club or organisation to which they happen to belong. The data, including hand-written notes, tables, and so on, is a Literary Work [3] within the meaning of the Act and incurs full copyright protection. If the survey data were originally recorded by dictation onto audio tape then it would still be covered by copyright [3(1), 5(1)], and the owner of that copyright would still be the creator (the 'author') of that data.
It may not always be clear which of the surveying team is the author. In the absence of any prior agreement, it is possibly the person who wrote down the numbers. If the person who actually created the data (the 'surveyor') simply called out the numbers to an assistant, who wrote them down, then it might be as well to establish authorship at the time. A note on the survey notebook "Survey legs 20-50 surveyed by Tom Swinsto" might be sufficient. Of course, it may be that the team are joint authors [10(1)].
Copyright to surveys made with the aid of a computer program resides with the draughtsman. If you typed in the data and manipulated the software to produce the survey then - provided you had obtained permission to use the data - the copyright in that survey belongs to you. What the Act actually says is that copyright resides with the "person by whom the arrangements necessary for the creation of the work are undertaken". [9(3)]. The survey is an Artistic Work [4] within the meaning of the Act and incurs full copyright protection.
The situation could occur where the survey data was used without the permission of the author(s). In that case, clearly the draughtsman is in breach of copyright and any copyright notice he places on 'his' survey is invalid. Note that the author of the survey data can give permission for it to be used without assigning copyright. If he allows its use on one specific occasion this does not mean that the data is available for anyone else to use.
Copyright to the computer program itself is owned by the author(s) of that program, which is a literary work [3] within the meaning of the Act.
An element of agreement is advisable, not simply to ensure that copyright is adhered to, but to avoid misunderstandings as to ownership of the data at a later date. There have been cases where teams of cavers have argued over subsequent use of survey data, some of which has been made unavailable for use by later generations of cavers.
The author of a work is the "first owner" of the copyright [11] unless it was made in the course of his employment, in which case the employer is the first owner subject to any agreement to the contrary. Note that if the work was commissioned this makes no difference - copyright still resides with the author. A caving club does not own the copyright to the survey data recorded by its members, even if they used club equipment on an official club trip (Unless, of course, an agreement to that effect is made in writing).
Copyright can only be assigned in writing [90(3)] but permission to copy can, of course, be given by an informal licence. If the authors of survey data want to "donate" the data to their caving club then a simple verbal agreement on the usage of the data is all that is required. However, in this case, copyright itself would still reside with the authors; and it makes sense for all agreements to be put in writing, whether they are to formally assign copyright, or just to give permission to use the data.
A common query relates to the position of expedition members who have not signed a formal contract. The survey data may reside in club notebooks, but the authors might not be contactable after a few years. In this situation it makes sense either to get the authors to formally assign copyright to the club or, if this is thought too bureaucratic, you can try to ensure that they give permission for the club to use the survey data. It seems to me (purely as a layman) that a statement of intent in the club's expedition newsletter might help your case, although it is presumably not legally binding. Something like "by participating in this expedition you are giving permission for the club to use your survey data and logbook notes as it sees fit. If you don't agree, please say so in writing".
Another thing you might consider doing is to put a statement in your expedition report / survey / club memoirs stating that "every effort has been made to contact the copyright owners of the material reproduced here". Assuming, of course, that you have done so. This doesn't do you any good legally, I don't suppose; but ethically it seems fair.
If a survey is made abroad, what country's copyright laws apply? The UK Act covers you wherever you created your work. It is legal protection which the UK government offers to its citizens. Don't even ask what happens if a foreign national helped with the surveying - go and get some legal advice!
Various rights are automatically assigned to the copyright owner, including the right not to have a work copied in any material form [17(2)] or stored in any medium by electronic means and, for a computer program, translated into or out of computer code [17(4)]. It is not necessary, in the UK, to register a work in order to obtain copyright protection. Note that, for cave surveys, it would be a breach of copyright to type the survey data into a computer without the author's permission. Subsequent usage or copying of the data (by duplicating computer discs, for example) would also be an infringement of copyright [23]. Note, though, that if the author gives you permission to use his data he is not necessarily assigning the copyright to you.
Suppose the original hand-written data were made into a hand-drawn survey without the use of a computer? Has copyright been breached? I am not really qualified to answer this. Copyright is protection against copying, not protection against using the information. If the data were typed into a pocket calculator the "transient copy" might possibly be an infringement of copyright [17(6)]. Photocopying the survey notebook, or copying the data by hand would be an infringement. There may possibly be Design Rights to the data [213 etc.] which would be infringed, but you would need to consult an expert.
In addition to Copyright, and the Design Right mentioned above, the Act introduced the concept of Moral Rights. These are probably not as relevant to the discussion of cave surveys, but I will include a brief description for interest. Moral Rights include the right to be identified as the author of your work and the right not to have your work subject to distortion or mutilation, or to treatment prejudicial to your reputation. There are other Moral Rights too. Moral Rights do not apply to certain types of publication, nor to computer-generated works. The latter are defined as works for which "there is no human author" [178], and so do not apply to computer-drawn cave surveys which clearly do not draw themselves, since they require a "draughtsman" to enter the data.
It might be prudent to have a statement along the following lines on any cave survey. No doubt there are variations and additions you might want to include.
Survey drawn by Tom Swinsto.
This Survey is copyright © Tom
Swinsto, 1996 and may not be reproduced without permission. First
published in the UK in 1996.
Original Survey Data:
Copyright © Dick Rowten, Harry
Simpson, 1993; Tom Swinsto, 1995
Thanks to D. Rising, P. Crawl and other members of Kingsdale Caving Club who helped with the surveying.
Survey drawn using CaveDraw!
The computer program is Copyright © Tim Cruncher 1990
A few years ago I consulted a large firm of lawyers to enquire about the copyright statement which I should put on a computer program I had written. The advice they gave me - which it would do no harm to take in respect of any literary work - was that to confer international protection you need to i) use the word "copyright" and the international symbol ©. (Note that a letter "c" inside two parentheses is not a valid alternative), ii) say who owns the copyright, iii) say who the author was, iv) state the year and country of first publication. As I said earlier, your works are automatically copyright in the UK - you don't need all that rigmarole. But to avoid misunderstandings and to give you international protection (if that worries you) you may need something like the above.
The situation described here applies to the UK since 1988. Works created before that date may be subject to different regulations. Legislation in other countries may be different. (Though presumably it is now similar throughout the European Union!).
Ian Harvey
Global Positioning System (GPS) navigation units have been getting steadily better and cheaper in the last few years. Garmin's GPS45 is one of the not-quite-latest generation of hand-held ones, having been around for the last 18 months or so. Is it worth the money, or should you keep hold of your wad for a little longer?

Physically, the GPS45 is a handheld unit similar in size and weight to a mobile phone, and can be easily carried in a coat pocket while out and about. There's a swivelling, detachable (via a BNC plug) aerial on the top corner, half-a-dozen squidgy rubber buttons, and a large full-graphics liquid crystal display with a blue EL backlight. Four AA cells slide in via a hatch at the bottom, and a single socket on the back provides external power and serial data connections.
The complete unit is sealed and described as waterproof. It is supplied with a manual, quick-reference card, and a carrying pouch. A data/power cable, aerial extension lead, and universal mounting bracket are available as extras.
Alkaline cells provide about 20 hours continuous operation, or an external supply of 5-40V DC can be used. Nicad rechargeable cells do work, but the lower capacity will provide only three or four hours' use. Operating temperature range is from -15 to +70 degrees C.
Finding your way round the system is pretty straightforward: all the action takes place on about five main screen pages: a 'Page' key steps round through each of these, and a cursor pad and 'Enter' and 'Quit' keys let you move around within each page. It's worth reading through the manual, though, as it does point out a few little features you might not have noticed.
After it is turned on, the system takes a period of time to lock onto signals from each of the GPS satellites overhead. This is usually under a minute if you've used it recently, but can be longer if you haven't and all the satellites have moved. The GPS45 can track up to 8 satellites; at least four are needed for '3D' (position and altitude) navigation and three for 2D positioning. The 'Satellite Status' display page shows a map of where the satellites are in the sky, the signal strength from each one, battery level, 2D/3D status, and the estimated horizontal accuracy in feet or metres.
The next display page gives all the basic GPS navigational information - a position, your current heading and speed if you're moving, an altitude (if available), and the time. The position can be displayed in a wide variety of formats: latitude/longitude, UTM, and British, Irish, German, Swedish and Swiss national grids. Distances and speeds come in imperial (feet, miles and mph), metric (m, km, and km/h) and nautical (nautical miles & knots) flavours, while bearings and headings can be relative to True North, magnetic north or grid north for your chosen grid. The time can be displayed for any time zone, but you have to select the difference between it and GMT manually. There are also 100-odd map datums, of which more later.
After this comes the Moving Map page, which plots a track of recent movements on a 2-D screen. The GPS45 will record the current position at regular intervals (yes, it's programmable in hours, minutes and seconds) and draws the path between them on the screen. Various annotations (waypoints, distance markers) can be added to the map, and the display can be zoomed and scrolled as necessary. The map can be orientated for north upwards or your current heading upwards; using the latter mode makes it particularly easy to retrace your steps. There is room for 768 position records in memory, (enough for a day's movements in fine detail), after which the oldest position is forgotten. The map is remembered even when the unit is turned off, and can be cleared if required.
After the Moving Map page comes the Navigation page. Using this, you can choose a waypoint as a destination and the unit will attempt to get you there. It displays the distance and bearing from the current position to the waypoint, together with the current speed and heading. It will also give a 'velocity made good' (i.e. the rate at which you are closing on the destination) and an estimated time of journey. Finally, a simple graphic display shows the ideal straight-line route from start to destination, and where you are in relation to it.
The final page, Menu, provides access to screens for map and navigation settings, and a variety of useful functions to do with routes and waypoints. It also provides control of the data port for connection to other systems.
The main navigational facilities on the GPS45 are based around 'waypoints', which simply mark a position on the map. You can save your current position as a waypoint, or create one by typing in a grid reference. This is then given a simple (6-character alphanumeric) name and stored in memory together with the current time and date. Waypoints can be renamed and deleted if required. The GPS45 can store 250 waypoints; these are also remembered when the unit is turned off.
It's worth noting that a waypoint is a position, not just a grid reference. If you change the display format (e.g. from OS grid references to lat./long), all the waypoints will also be correctly displayed in the new format. A variety of useful calculations can be done with waypoints (e.g. nearest waypoint to the current position, bearing & distance between two waypoints, or what time the pub closes - sorry - sun sets at a given waypoint).
Waypoints can be linked together to form a 'route'; up to 20 routes can be given a name and saved. A particular route can then be activated, and the Navigation screen will guide you to the first waypoint. When the first is reached, the second will be automatically selected, and so on. Routes can be renamed, edited and deleted as necessary.
To get the GPS to work properly with the map or chart you are using, you need to select the correct map datum. Selecting the wrong one can result in positions being wrong by as much as a few miles. What is a datum, and why does this problem arise? When a map is made, the surveyors need to choose some points as reference points; the latitude and longitude of these points is then measured and the rest of the map is made relative to these. Naturally, not all surveys are going to agree on their reference points, and a given point may be marked on two different maps at two different latitudes and longitudes. The GPS needs to know which set of reference points you are using so that, when you look up the position on the map, you end up at the right point. This set of reference points is the map datum.
The GPS45 has 102 map datums available, which are listed in more detail in the manual. Fortunately, these are mostly for remote Pacific islands or South American countries who want to annoy their neighbours. There is just one datum to choose for the British OS maps, which you will need to use to ensure that OS grid references are displayed correctly.
(Latitude and longitude are generally measured by knowing the time and measuring the position of the stars above the horizon. Knowing the time on a remote island was, in fact, quite hard work in the days before quartz clocks and radio. Also, the fact that the Earth is not a perfect sphere means that the horizon is not quite at the right angle; later surveys have needed accurate measurement of the shape of the planet to compensate for this).
I've had a GPS45 for almost a year now, and have been using it in a variety of circumstances on the way. I've not had any reliability problems; nothing has stopped working or broken off, nor has the software done anything particularly unexpected or unpleasant. It has stood up to the general wear and tear of knocking round cars and rucksacks; getting the unit mildly wet - carrying it in an outside coat pocket in the rain, or using it on deck on a ferry - hasn't produced any adverse effects. The aerial, which sticks up when in use, may be the only weak point if, say, you're prone to crashing while skiing at speed.
Obviously, the performance of the system depends critically on the strength of signal reception from satellites. It also depends on the positioning of the satellites in the sky - if they are spread out it is better than being clumped together. I've found no problems at all when using the GPS45 on open ground with a clear view of the sky; six or more satellites are usually picked up reliably; reception seems unaffected by cloud or rain. Where the sky is obscured e.g. standing at the foot of a cliff or tall building, some signals do become cut off. Ordinary trees and woodland don't seem to have a significant effect, although I've not tried any really dense bits of Forestry Commission yet. Using the GPS45 in-car, I found it best to keep the unit on top of the dashboard, with a clear view up through the windscreen. Moving it inside the car generally cuts off enough signal to cause problems, as do such things as tunnels or bridges overhead, or narrow streets between tall buildings. While on the move, this is not a major limitation; the position display stops at the last known position, and picks up again as soon as the signal is restored. Overall, I haven't found many situations where I simply couldn't get a position, none of which give me particular cause for concern.
How accurate are the results? The positional accuracy of the unit is given as 15m inherent uncertainty, plus 100m which is deliberately added to the GPS transmissions by the US military, who run the satellites. This would imply that a 6-figure OS grid reference (a resolution of 100m) may occasionally have a digit wrong. I found this a little pessimistic; my general experience is that, whenever I've been able to check, it would always give a position as accurately as I could read it on a 1:50 000 OS map. The 'deliberate error' doesn't change very quickly either; a stored position seems to remain accurate within 20m or so for at least a couple of hours [Ed: in fact SA is only likely to give repeatable results for about 15-20 minutes - after that the position is likely to move significantly].
Bearings given by the unit are calculated from the position data; they will be no more or less accurate than these positions - in typical use this is at least as good as can be measured with an ordinary compass. The current speed readout is eminently useful; it is considerably more accurate than the average car speedometer. On a suitably stable platform (e.g. a ferry), the speed and current heading readout is rock steady, but holding the unit while walking does produce fluctuating figures. The Navigation page gives a 'which-direction-to-go' display based on the current heading; I would treat this with some caution - it's more reliable to find the given bearing with a compass.
So what does it realistically offer to the average traveller, apart from finding your car in the supermarket car park? I've found it indispensable for driving in unfamiliar towns, as the primary means of navigation. It's well worth getting the two OS maps which cover London; they all start to make perfect sense when used with the GPS.
For walking and other outdoor activities, I have generally used it as a backup, and use traditional map-reading to find the way. You could, I suppose, type in the entire route you plan to take beforehand, and walk for miles guided by the little screen, but it is a bit time-consuming with the GPS45's up-down button system. I have tended to keep the unit switched off most of the time while walking; at important points on the way (e.g. junctions, abrupt turns, the starts and ends of proper paths) it's worth switching on for just long enough to store the position as a waypoint. This makes it easy to retrace your steps; the time stored with each waypoint allows you to accurately monitor progress and judge whether it's time to turn back. It is a potential lifesaver if you get lost through fog or lack of daylight. I've also found it invaluable for checking inaccurate or out-of-date maps; knowing where you are makes it easy to identify paths and landmarks that have suddenly sprung up, moved, or disappeared.
The GPS45 doesn't replace a map, or even a compass. It does, however, give positions you can trust, within common-sense limits. It lets you check up on your own navigation and helps avoid mistakes. It's also a phenomenally satisfying gadget which will give hours of button-pushing pleasure.
I bought my GPS45 last year from Sea Teach in Emsworth, Hampshire (01243) 375774 for £259 inc VAT. A combined power/serial lead cable was an additional £20 inc VAT.
The Internet is awash with interesting GPS45 information: check out:
http://www.warrior.com/garmin/gps45.html
(product information)
http://www.tech.net/technotes/gps/g45faq.txt
(frequently asked questions)
http://galaxy.einet.net./editors/john-beadles/eqp_gph.htm
(more GPS reviews)
By Peter Eland (ICCC). 'Method 2' by Wookey (CUCC).
This article describes a number of methods which can be used to enter surface contour data in a form which can be used by the cave survey software SURVEX Cave Rotator and, with some modification, by others. The computer requirements range from a basic DOS machine, to a Computer Aided Design (CAD) system.
When exploring a cave system, it is often useful to know how the centre-line survey relates to the shape of the countryside beneath which the cave lies. Uses to which the information can be put are:
When considering the integration of surface contours with the computer model of the cave centre line, the following factors apply:
Equipment: Ruler, preferably set square, text editor with cut and paste.
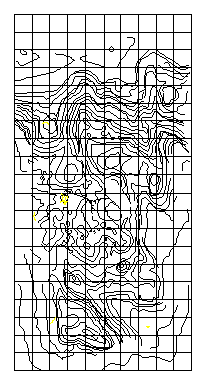
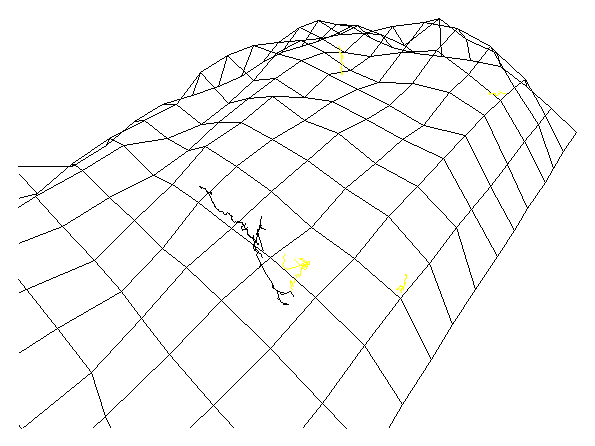
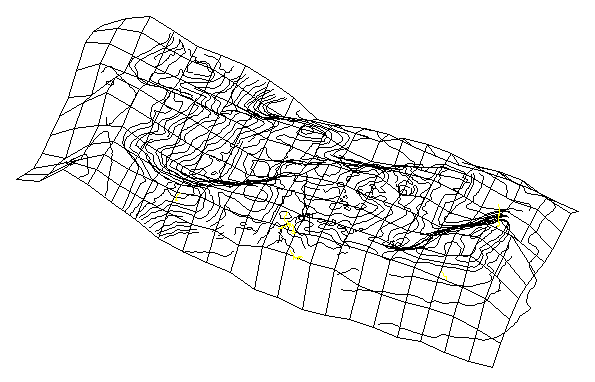
This method will produce a surface mesh of the form illustrated in Figure 3. This can be used in the SURVEX Cave Rotator. Proceed as follows:
a) Decide on a convenient origin point on the map. This should usually be a grid line intersection, trig point, or other fixed point relative to which cave entrances can be located.
b) Draw a grid on the map, with the lines going North-South and East-West. The spacing between the lines should be chosen to reflect the area to be covered, the accuracy required, and the time available. Number the grid lines. If you don't want to mark the map, draw the grid on tracing paper and lay it over the map.

c) Using a text editor, create a file which mimics the format of the SURVEX .3d file. For example:
Survex 3D Image File
v0.01
plateau.svx
Sat,1995.09.23 18:17:21 EDT
name \mesh.0000 0.00
0.00 1880.00
name \mesh.0001 0.00 100.00
1950.00
name \mesh.0002 0.00 200.00
1990.00
name \mesh.0003 0.00 300.00
1940.00
...
move 0.00 0.00 1880.00
draw 0.00 100.00 1950.00
SURVEX uses the positions in the 'name' list to determine how much space the plot will need on-screen, so at the very least the top-left & bottom right points must be named and positioned as above. In fact, for the purposes of generating the file, it is convenient to 'name' all of the grid points first, before doing the 'move' and 'draw' lines. To do this, read off the height of each point in turn. The point is given a name (here, 'meshXXYY', with XX representing 100s of meters East, and YY representing 100s of meters North). The name and the three co-ordinates are then typed into the text editor, ensuring that the columns conform to the spacing shown. The co-ordinates are entered here going up, then across. When this is done, load the file into the SURVEX cave rotator to check that no errors have been made.
Note that it makes things easier if there are an even number of points both East-West and North-South.
d) To complete the SURVEX 3d file and to create lines linking the points, the 'pen movement' instructions must be entered. Those confident in macro programming will find ways to automate the process, but the manual method is shown here. It is convenient to keep a 'working' copy with the sections (see later) of the file clearly separated and labelled, removing the labels when testing with Cave Rotator. This simplifies error-finding and editing.
...
name \mesh.1019 0.00 200.00
1990.00
name \mesh.1020 0.00 300.00
1940.00
move 0.00 0.00 1880.00
draw 0.00 100.00 1950.00
move 0.00 200.00 1990.00
draw 0.00 300.00 1940.00
...
draw 1000.00 1700.00 1840.00
move 1000.00 1800.00 1970.00
draw 1000.00 1900.00 1900.00
This is not (quite) as lengthy as it sounds. Cut and paste is quite quick, and the replacement process can be fairly easily automated. More efficient entry methods are also fairly easy to devise.
Equipment: Scanner, bitmap editing software, bitmap tracing software, some programming.
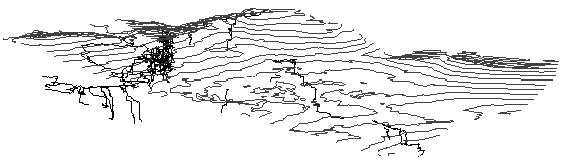
In this method, the map is scanned, the image cleaned up manually, and then a program is used to trace the contours and another one to convert the data to SURVEX format. This method has been used by CUCC (Cambridge University Caving Club), and is described below.
This method is not quite as tedious as generating the mesh by hand as for method one, but still involves a great deal of work.
The converted image needs to be saved as HPGL, because this is a simple text format that you can understand and fiddle with.
HPGL basically takes the form
PU 17340 890
PD 17450 990
etc., where PU is Pen Up, and PD is pen
down. The following numbers are the co-ordinates, of course.
It is a pretty straightforward matter to read this in, and for every 'pen up' command start a new survey at the specified fixed point, then for every 'pen down' convert the co-ordinates back to the compass & tape readings (with horizontal clino readings, as we are following contours) that would give the required offsets in X & Y. The 3 digits of the compass reading and 2 decimal places of the tape reading seem quite sufficient to prevent significant errors building up along the traverses.
You will end up with a file that looks like this
*begin contour1
*FIX 0 36715.40 83337.69 0
0 1 10.56 89 0
1 2 20.25 141 0
2 3 56.17 163 0
..
25 26 17.20 207 0
*end contour1
*begin contour2
*FIX 0 36603.24 83342.97 0
0 1 4.53 225 0
1 2 5.15 246 0
...
Equipment: Mouse with a linear motion arrangement, drawing software with 'sketch' function, scaling and text-format output option (e.g. some CAD packages), text editor preferably with macro programming facilities
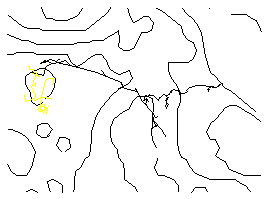
This will produce a contour map, shown in Figure 5 combined with the surface mesh produced in Method 1. In this case, AutoCAD v. 10 (Autodesk Inc.) was used. Some shareware alternatives may also be suitable. Depending on the output options of the software, it may be possible to load the contours into Cave Rotator.
Accuracy may not be as great as Method 2, as the method depends upon accurate movement of the mouse (controlled by a fallible human hand), the accuracy of the linear motion for the mouse, and the accuracy of the scaling of mouse movement to screen drawing.
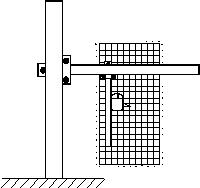
If a full linear motion device is not available, a simple 'pivot and slide' arrangement can be improvised, as shown in Figure 7. This method was used to create the contours shown in Figure 5. It will be seen that the further that the pivot is from the mouse, the smaller will be the errors caused by the rotation of the mouse.
Most software will offer an option which allows the contours to be drawn as line segments of specified length: as soon as the mouse moves more than a certain distance from the last point, a new segment is drawn. If this is not available, it is possible to proceed by clicking the mouse to draw segments manually, although this makes tracing contours smoothly difficult.
Inaccuracies (slip of mouse, inaccurate calibration) will accumulate as long contour lines are drawn, so it may be helpful to draw the contour in sections bounded by grid lines, zeroing the mouse between each.